
Gluten-Free Pumpkin Pie Cupcakes
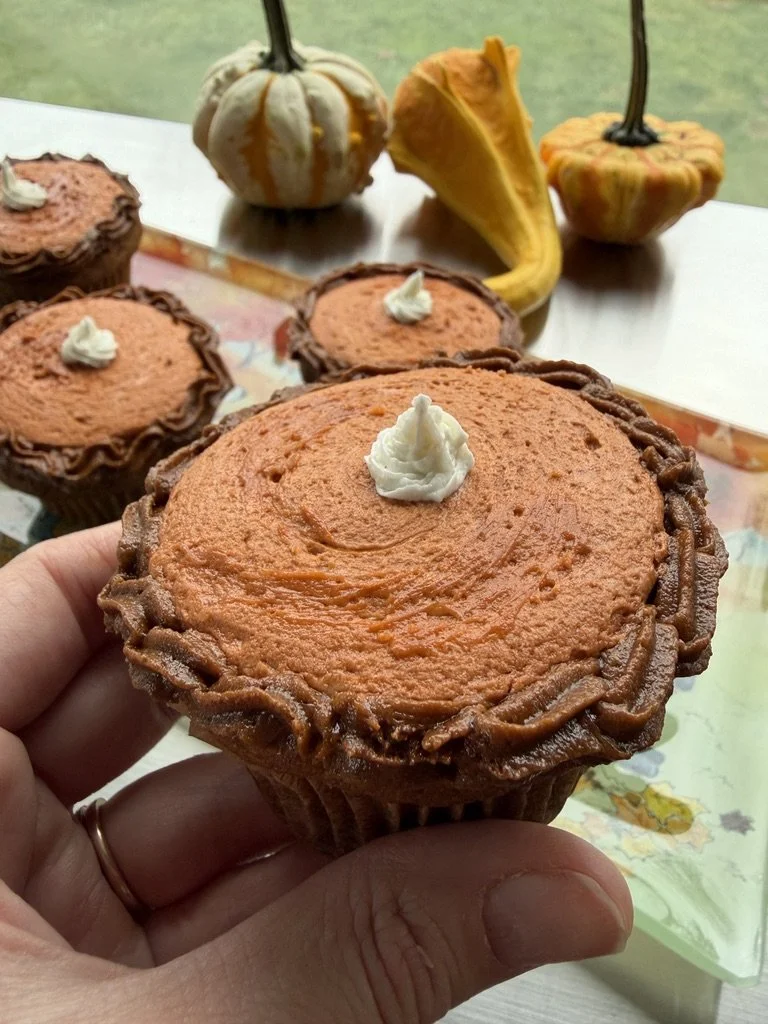
There’s something about pumpkin desserts that instantly signals the start of the cozy season—candles burning, sweaters coming out of storage, and the sudden urge to bake something warm and cinnamon-spiced. These Gluten-Free Pumpkin Pie Cupcakes take all the best parts of a classic pumpkin pie (the velvety filling, the warm spices, that nostalgic fall flavor) and wrap it into a soft, tender cupcake that actually holds together and isn’t overly sweet. Think pumpkin-pie-meets-cake, but done the Little Hands Kitchen way: gluten-free, easy to make, kid-friendly, and decorated so adorably that they’re guaranteed to steal every fall dessert table. Each cupcake gets topped with a smooth pumpkin-tinted buttercream, a braided buttercream “pie crust,” and a tiny whipped-cream-style swirl right in the center—so they look exactly like miniature pumpkin pies without the hassle of blind baking, cracked custards, or pie dough. They’re simple enough for a weeknight bake, pretty enough for Friendsgiving, and guaranteed to become one of those recipes people ask you for long after the holidays are over.
Gluten-Free Pumpkin Pie Cupcakes
Soft, pumpkin-forward cupcakes with warm spices, vanilla bean paste, and a lightly sweet buttercream “pie crust.” Decorated to look just like mini pumpkin pies—with a perfect whipped-cream dollop on top.
These gluten-free pumpkin pie cupcakes taste like the filling of a classic pumpkin pie—soft, custardy, warmly spiced—wrapped inside a tender GF cupcake that actually holds together. They’re less sweet, more pumpkin-forward, and flavored with rich vanilla bean paste and extra cinnamon for true autumn comfort.
- Nonstick Cupcake Pan: Ensures even baking and perfectly shaped cupcakes every time.
- GF 1:1 Flour Blend: A cup-for-cup gluten-free flour ensures the perfect tender crumb.
- Vanilla Bean Paste: Adds warmth and depth that pairs beautifully with pumpkin spice.
The buttercream decoration is the showstopper—piped to mimic a braided pie crust edge and finished with a tiny vanilla “whipped cream” swirl in the center. So cute, so festive, and honestly… easier than it looks.
This post may contain affiliate links. If you purchase through my links, I may earn a small commission—at no extra cost to you. Thanks for supporting Little Hands Kitchen!
Ingredients
Pumpkin Pie Cupcakes
- 1 cup pumpkin puree (240 g)
- 1/2 cup light brown sugar, packed (100 g)
- 2 large eggs, room temp
- 1/3 cup neutral oil (70 g)
- 1 tsp vanilla bean paste
- 1 cup gluten-free all-purpose 1:1 flour (120 g)
- 1 tsp baking powder (4 g)
- 1/2 tsp baking soda (3 g)
- 1 tsp cinnamon (3 g)
- 1/2 tsp pumpkin pie spice (2 g)
- 1/4 tsp fine sea salt (1 g)
Buttercream
- 1/2 cup unsalted butter, room temperature (115 g)
- 1.5–2 cups powdered sugar, to taste (200–250 g)
- 1 tsp vanilla bean paste (or vanilla extract)
- Pinch of fine sea salt
- Gel coloring: orange, brown, and yellow colors
Whipped-Cream Dollop Buttercream
- 1/4 cup from the above buttercream batch (before coloring)
- Optional: 1–2 tsp extra hot water to slightly loosen for smoother piping
Directions
Make the Cupcakes
- Preheat oven to 350°F (175°C). Line a muffin tin with 12 cupcake liners.
- In a bowl, whisk together pumpkin puree, brown sugar, eggs, oil, and vanilla bean paste until smooth.
- In a separate bowl, whisk GF flour, baking powder, baking soda, cinnamon, pumpkin pie spice, and salt.
- Add dry ingredients to the wet and mix gently until just combined. Batter will be slightly thick.
- Fill liners 2/3 full. Tap the pan to release bubbles.
- Bake 18–20 minutes or until the centers spring back. Cool completely before decorating.
Make the Buttercream
- In a mixing bowl, beat the softened butter and a pinch of salt on medium-high until smooth, pale, and fluffy—about 2 minutes.
- Add powdered sugar gradually, starting on low speed so it doesn’t puff everywhere. Increase to medium-high and whip until creamy and spreadable. Adjust with more powdered sugar for a stiffer texture.
- Mix in vanilla bean paste and beat 30–60 seconds more until fully combined.
- Set aside 2–3 Tbsp of uncolored buttercream in a small bowl for the white “whipped cream” dollop.
- Divide the remaining buttercream into two bowls:
- Bowl 1 – Pumpkin Filling Tint: Tint this portion a warm pumpkin color using orange gel + the tiniest touch of brown or yellow. This will be spread flat on top of each cupcake to look like pumpkin pie filling.
- Bowl 2 – Pie Crust Tint: Tint this portion a light golden-tan using brown gel + a touch of yellow to mimic baked pie crust. This will be used for the braided border.
Decorate to Look Like Mini Pumpkin Pies
- Create the pumpkin “filling” top:
Using the pumpkin-tinted buttercream (Bowl 1), spread or pipe a thin, smooth layer over the top of each cooled cupcake. Aim for a flat, even surface that looks like the surface of a baked pumpkin pie. - Pipe the braided “crust” border:
Fit a piping bag with a Wilton #21 or #18 star tip and fill it with the pie-crust–colored buttercream (Bowl 2). Hold the bag at a 45° angle along the edge of the cupcake and pipe a tight rope/braid pattern all the way around. Use small “S” movements to mimic a woven pie crust—this is what gives you the exact look from your photo. - Pipe the “whipped cream” dollop:
Fit a second piping bag with a Wilton #32 or #199 small star tip. Fill it with the reserved uncolored buttercream. Pipe a small swirl right in the center of each cupcake so it looks like a spoonful of whipped cream on top of a slice of pumpkin pie. - Chill to set:
Place the decorated cupcakes in the fridge for about 10 minutes to help the crust edge and center dollop firm up and hold their definition.
Flavor Notes: These cupcakes are intentionally less sweet and more pumpkin-forward—like creamy pumpkin pie filling in cupcake form.
Storage: Store decorated cupcakes in an airtight container at room temp 1 day or refrigerate up to 3 days. Freeze unfrosted cupcakes up to 2 months.
Color Tip: For the pie-crust shade: a drop of brown + one tiny touch of yellow creates a warm, baked crust tone.